Torque Drift 2 runs on Epic Games’ Unreal Engine 5, which is what you will need to download to create and test any of your maps. This information is widely accessible thanks to Epic’s online documentation and YouTube channel but be sure to look for information specifically about 5.4. We will not go through any information on the basics of using Unreal Engine in this documentation as any tutorial we could provide would be better explained through Epic’s current platforms.
Modding is the way for players to create their own content inside Torque Drift 2's framework. Implemented and controlled through mod.io, players have the freedom to create any drifting maps they can imagine to be played and rated by the greater community. The below FAQ will go into detail on how to set up Torque Drift 2's modding files and the best ways to avoid some of the more common issues.
If you have already or are currently creating a mod with the old Modkit (26/04/2024 or older), please follow this guide to update your Modkit to the new version to ensure your Mods’ compatibility with future updates to Torque Drift 2.
Torque Drift 2 is built using Epic Games’ Unreal Engine 5. Specifically, we have built the game using the 5.4 version for its accessibility to environment art tools which you can download here: unrealengine.com/en-US/download.
After downloading and installing Unreal Engine, please download the Visual Studio launcher here: https://visualstudio.microsoft.com/vs/community/.
Once downloaded and installed, you will need to open the Visual Studio installer and download ‘Visual Studio Community 2022’. When it asks you what kind of workloads you’d like to install, select Desktop Development with C++ and Game Development with C++
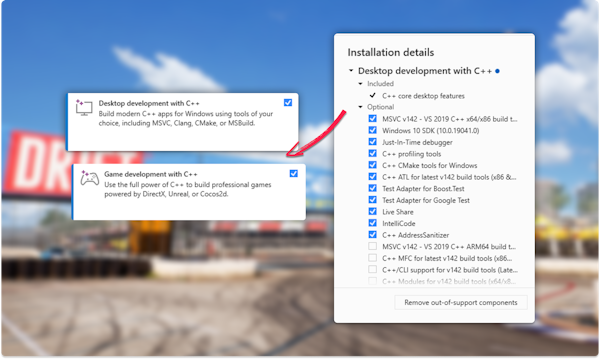
Now that you have both Unreal Engine and Visual Studio, you can download the latest version of the modding project from the link below.
Choose the location where you normally install your games to install the Modkit. If you only have one storage solution, select the C: Drive.
After it has been downloaded & installed successfully, double-click the “TD2_ModKit” uproject file to open the Unreal Engine project. You should now be able to mod the game and create new maps for the world to play!
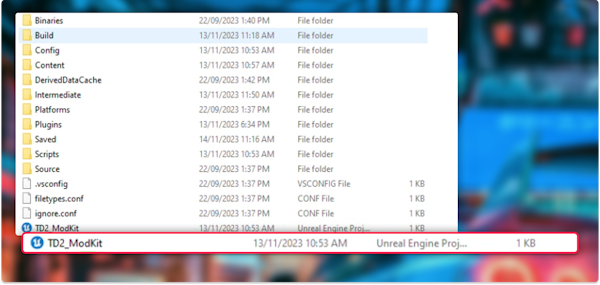
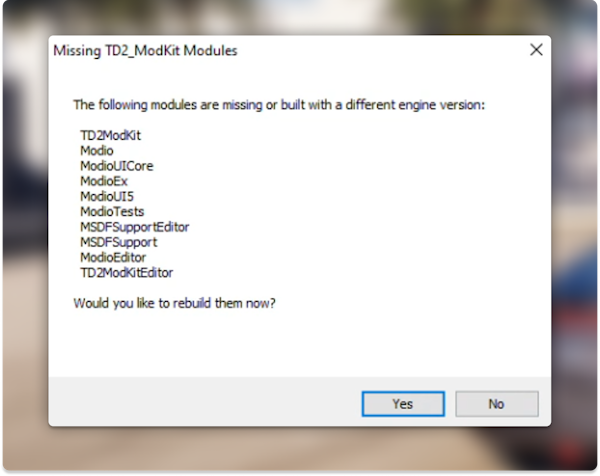
When you first open the project, you will most likely encounter the window below. This is normal and is just the project updating the plugins we use to be compatible with your machine. Click yes on the notification and it should install everything needed.
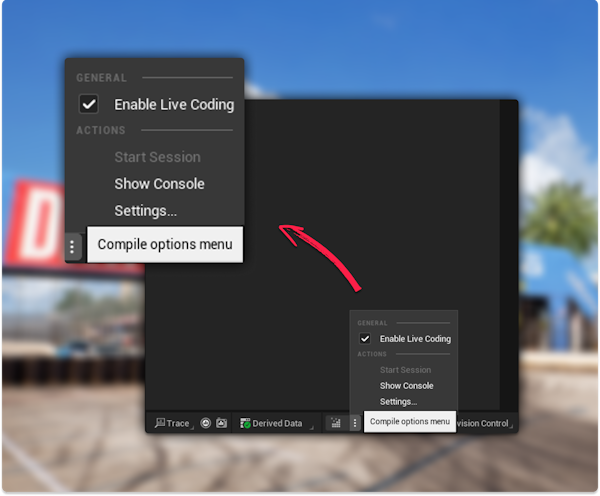
We’ve noticed some issues with launching the game from the editor due to the live coding option being on. For peace of mind, be sure to turn this off when you get into the project to ensure you don’t encounter these issues.
Now that you have Unreal Engine setup with the Torque Drift 2 SDK files, you can now start making your own map. To begin this process, go to the top navigation bar of Unreal Engine and press this Torque Drift 2 button.
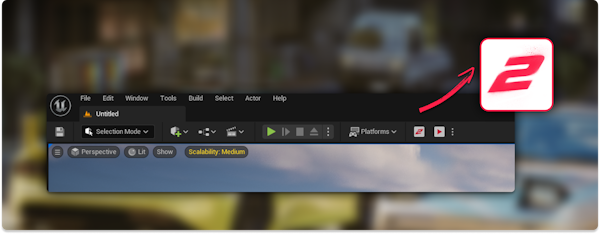
This should open the Modkit window
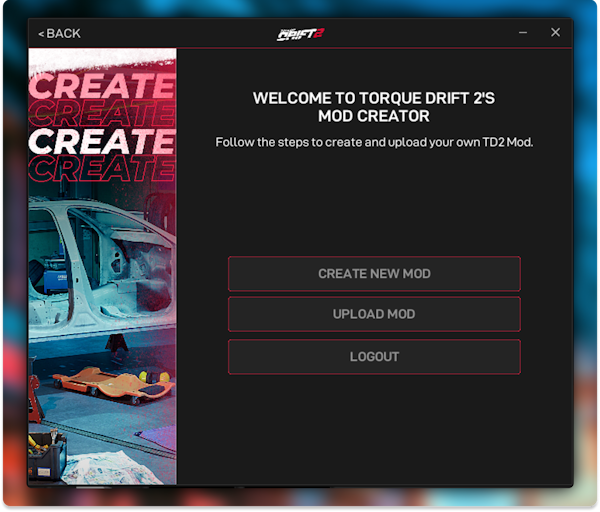
From here, you are able to create a brand new mod with the ‘NEW MOD’ button or upload a mod to mod.io using the ‘UPLOAD MOD’ button. Click on the ‘NEW MOD’ button to begin. The window should look like the image below once clicked.
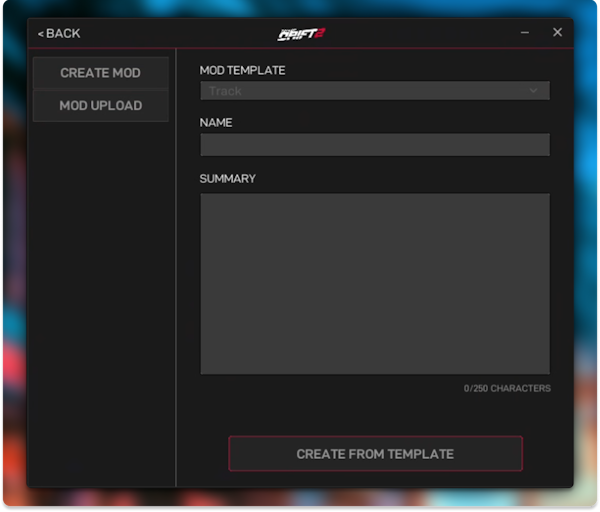
Press the down arrow on ‘Mod Template’ and select the only option there. Type in a name without spaces and a summary. Press the ‘CREATE FROM TEMPLATE’ button which should create a new folder in the same location as below like in the image below.

Each map tutorial gives the same assets whenever you first create the file. By default, these are the level itself, which is what is called when inside the game, and the data asset table, which tells the game what information the player sees on mod.io. The mod folder that was created for you will be where everything unique is pulled into the game so make sure that any new assets you create that aren’t in Torque Drift 2, are placed in these folders. Assets that are not in this folder but are called in the scene will return errors that will make your level unable to be played.
You are now free to create your level however you please. If you are new to Unreal Engine, one of the easiest tools to begin your journey in creating is by using the BSP tools supplied by default.
Documentation can be found here on how to use BSPs: https://docs.unrealengine.com/5.2/en-US/geometry-brush-actors-in-unreal-engine/
So you’ve done a couple of passes on the level now and want to test it to make sure you have the desired experience. One of the benefits of our SDK is that we have the entire testing phase set up with a single button press. First, however, you will need to map your unreal engine to the games .exe file.
Before you begin testing, you’ll need to first go to ‘Edit > Editor Preferences > Torque Drift 2 > General Settings’ and change the TD2 Application Path to where your Torque Drift 2 .exe file is.
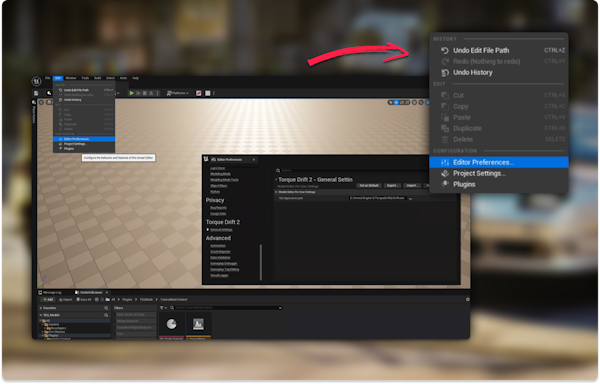
Once linked, select the three dots at the top of the screen next to the Torque Drift 2 modkit button. It should open a list of maps as shown below. Select the map you wish to test.
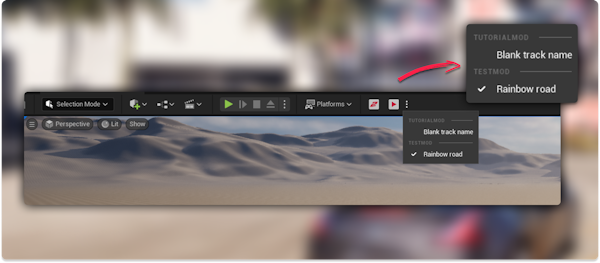
After that, all you need to do is press the blank square button next to the Torque Drift 2 modkit button at the top of the screen. Be aware that this can take 5 minutes or more on the initial test of your map where it will build the level and open it in a standalone version of Torque Drift 2.
The final step of this process is uploading your mod to mod.io. You can do this at any time during your process and you’re even able to reupload any updates you have but is often completed once you are ready to let the public see your map. When you’re ready, go back to the modkit window and click on the ‘UPLOAD MOD’ button.

Fill in the information for the mod and press the build and upload mod button once completed.
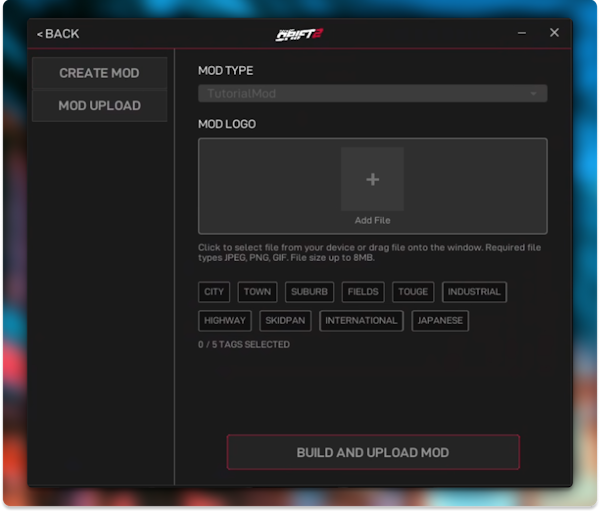
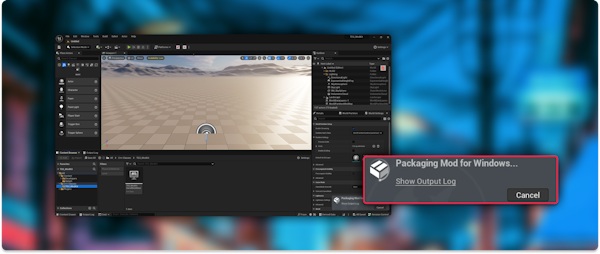
Once clicked, the map will begin packaging in the backend with an icon showing in the bottom right-hand corner of the screen. You can open the packaging log up but clicking the ‘show output log’ but the level will not be ready to be uploaded until the packaging has been completed.
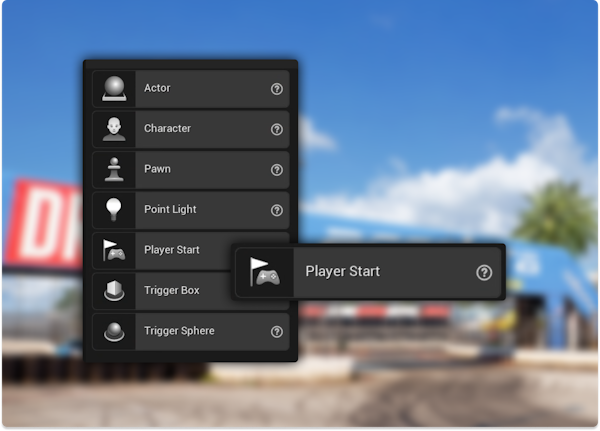
The Player Start asset that can be found in the “Place Actors” menu should be placed on every map to mark the spawn location for player vehicles. Without one, the map will load the car to a random default location.
Please ensure you place 4 Player Start actors in the scene before uploading your mod, to allow for multiplayer compatibility with your mods
With this new Modkit, we have included a bunch of new default lighting scenarios for players to use if you so desire.
To use these, follow the steps outlined below.
- Make sure you’re loaded into your Mod Level and have saved before continuing.
- In your content Browser navigate to “TD2ModKit Content” > “TD2_Generic_Lighting_Scenes”.
- Select and drag any of the lighting levels into your level viewport.
Congratulations you now have lighting in your level.
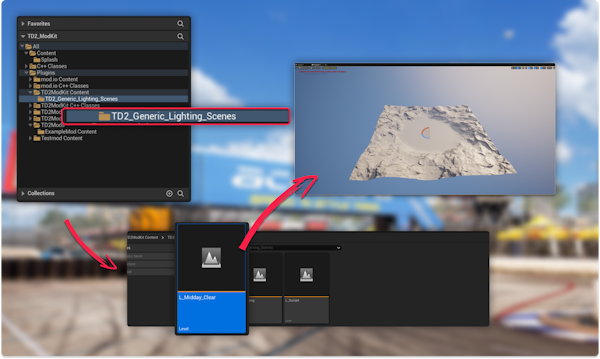
Okay, so you followed the previous steps and it’s still not looking how you want it to. That’s okay you can change it to how you like!
The lighting levels can be altered pretty easily. If you need to do so, follow the steps outlined below.
- Open the Lighting scenario level that you want.
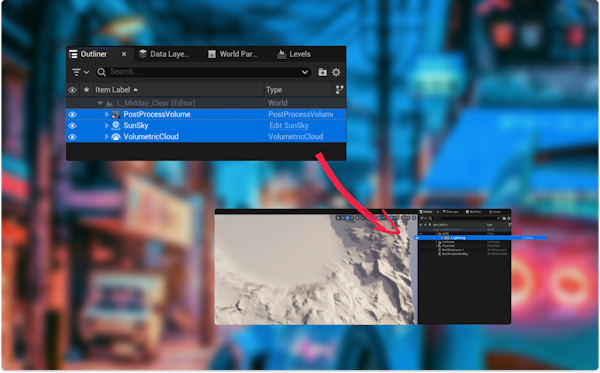
- Once you are in that lighting scenario level, Highlight and copy the contents of the lighting folder.
- Now go back to your Mod level
- Once it has loaded, create a new Lighting Folder in the outliner.
- Paste the contents into the Lighting Folder in the outliner.
- You are now free to edit the lighting how you like!
Preparing your new Modkit
Download your new Modkit from the previous link above and extract the folder in your designated position.
Do not Delete the old Modkit yet, you still need to access the files if you want to import your Mod from the previous version.
Unreal Engine Install
Torque Drift 2 uses Unreal Engine 5.4 (5.4.3).
Because of this, any Mods created before the 0.11 release will no longer work and need to be updated.
To continue creating mods, please download Unreal Engine 5.4.3. You can download Unreal 5.4.3 here: unrealengine.com/en-US/download.
Updating your Mods
Before you proceed, please ensure that all the files you need for your Mod are in the “Tracks” Content folder.
Open up two Windows Explorer windows. On one of the windows navigate to the “Plugins” folder of your old Modkit folder.
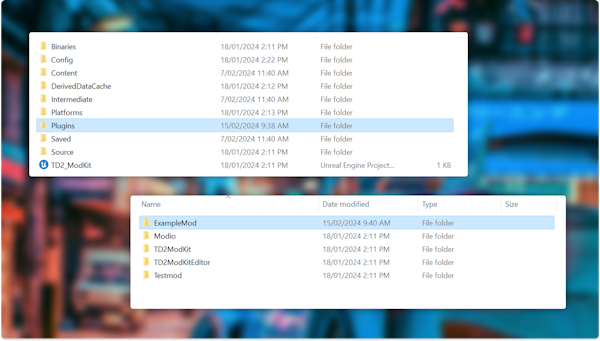
On the other window open up the “Plugins” folder of your new Modkit.
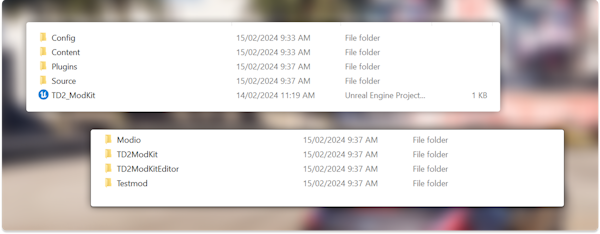
Copy your Mod folder from the old Modkit and paste it into the new Modkit.
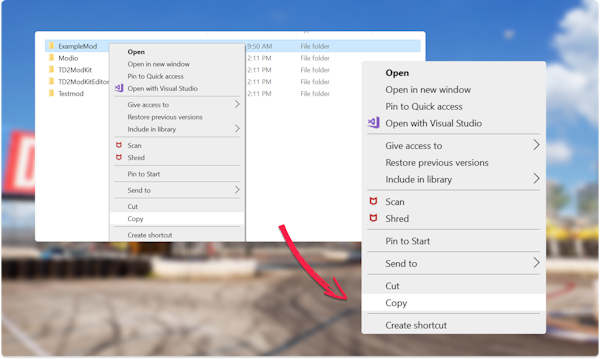
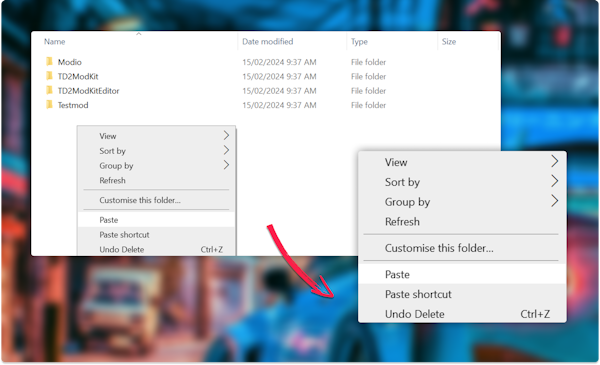
Once you’ve done this, you can open the new Modkit. The level should be ready to go.
With this update, you can now create “Multiplayer mods”. Because of this, ensure that your updated tracks include; 4 “Player Start” assets spaced out evenly to ensure a smooth player spawn for all players.
Overview
This guide provides instructions for creating advanced mods for Torque Drift 2 using the TD2 Modkit. It goes beyond basic environment creation and covers topics like vehicle identification, multiplayer replication, blueprint mechanics (such as jump pads and moving obstacles), and optimization techniques for file size and performance. Together, it will give you the information you need to create unique tracks with game modes similar to the GMG created “Torque Guys” Mod. https://mod.io/g/torque-drift-2/m/torqueguys#description
This guide assumes that you have some familiarity with the Unreal Engine and using blueprints.
BLUEPRINT MECHANIC EXAMPLES
The Blueprint Samples can be now found included in the Modkit! You can find them under
PLUGINS >TD2Modkit Content > ExampleBlueprints
Feel free to use / modify / improve these for your mods! These were built as Really simple beginner examples of logic you can add to your levels, Note: Remember to Copy the content into your mod folder BEFORE dragging them into your modded level, otherwise the referenced blueprints may be incorrect and the assets will be missing in your mod after packaging and testing outside of the editor. Best practice is to copy the blueprints you want to use from the ExampleBlueprints folder into your mod folder first, before dragging them into
These example Blueprints are:
- Jump Pad
- Teleport
- Attach Actor
Moving Obstacles
- Spinner
- Pusher
- Physics Props
VEHICLE IDENTIFICATION / COMMUNICATION
Communicating with the player actors, can at times be difficult outside of Triggerboxes in the event that you need to Get all of class, or determine the right actor is identified you can use these Actor prefixes to ID them
All Player Vehicle actors Can be identified by the Prefix xvp
All Spectator players can be identified by the prefix DriftFreeCamera

(using overlapping Colliders you can use that event to get the vehicle player)

(Getting all Pawns, and searching if relevant)
CREATING MULTIPLAYER FUNCTIONALITY
There are currently limitations in how much information we can expose for multiplayer functionality within Mods, though if you script under the assumption of no direct player control, you will still be able to create quite complex multiplayer functionality in your mod.
In the event you need to make sure your mechanics with be working on most players screens you can follow the following
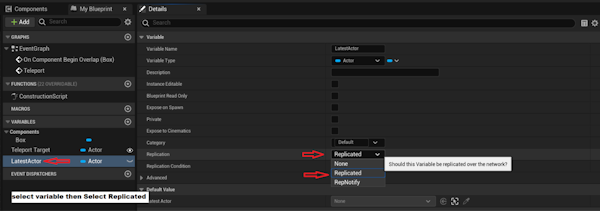
Make sure your variables are replicated
Replicate variables.
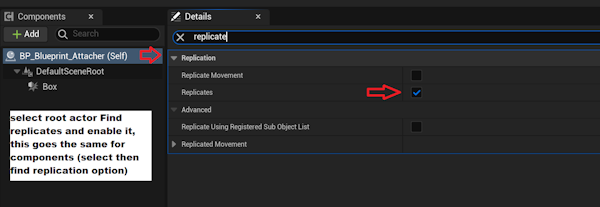
Make sure your actor and components are replicated
Make your Events fire on server (custom or bindings)

DEBUGGING / TESTING ADVICE
For blueprints communicating with players or advanced logic systems, using Modkit build and test is recommended. However, for larger mods where this becomes inefficient, you can either optimize the mod, (see the optimization tips section) or add a default Unreal Engine sample content gamemode (Thirdperson, Firstperson, or Vehicle are recommended).
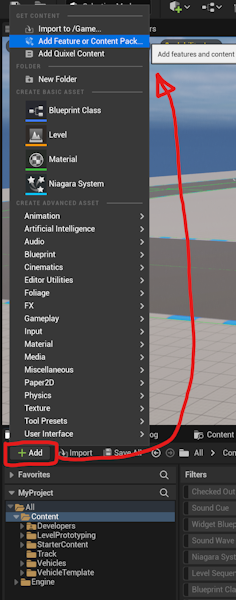
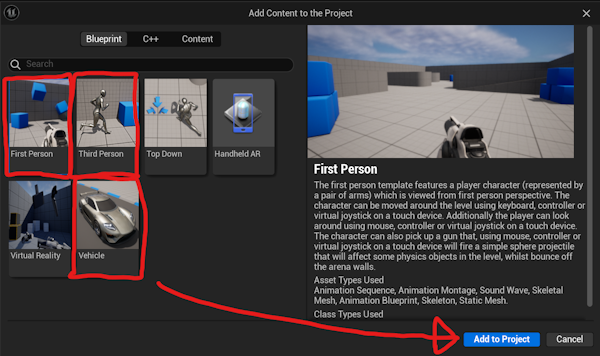
Once added Go to the Gamemode world override and Overwrite the gamemode
Provided you haven't moved the sample content you can safely play using them detached from the mod and its filesize
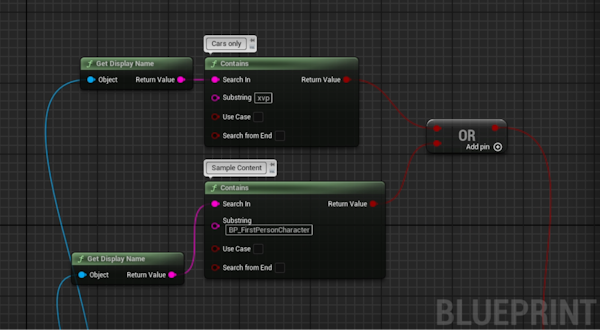
To test gameplay elements like a jump pad in the editor using sample content (e.g., to see if it launches all objects or only cars), employ an And condition in your branch evaluation. This allows the inclusion of the sample content actor during in-editor testing, providing a preview of its behavior with actual game elements.
OPTIMISATION TIPS
Firstly while using your mod in editor try using Stat unit and Stat FPS in the console
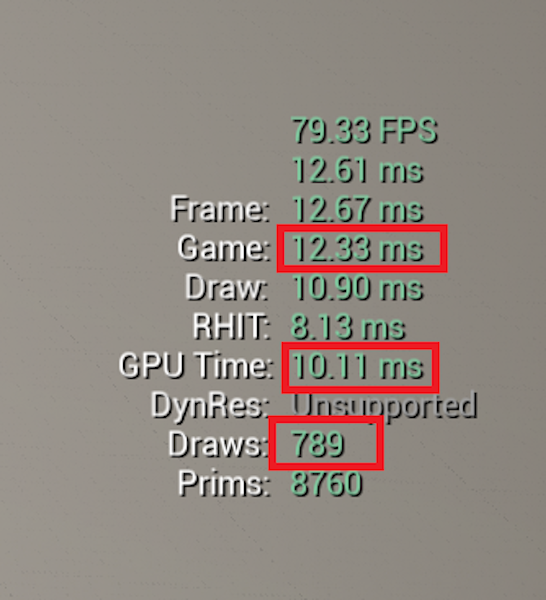
The first you want to check is
Game (Generally code or Particles)
- GPU Time (total of gpu rendering ie lighting textures models rendering effects)
Typical worst offenders for your gpu time are the followingTextures
Check if the resolution is far higher than nessacary or using too many textures per material, (use channel packing ideally)Lighting
Check that your lights have culling distances and appropriate attenuation radiuses, actually need shadow casting or not and you do not have overlapping or copious main lights (multiple suns / huge shadowcasting stadium type lights)Meshes
We are currently using Nanite internally, we recommend using nanite on all your models that are applicable, if your Nanite meshes are still too complicated consider reducing them or how many models are in your scene or are un-instanced (if not movable most / all models should be instanced, When not using nanite remember to add lods
Draws (is the total amount of unique things your machine needs to pull create and render per frame)
Draws include all types of meshes (worse if not instanced), special actors, Decal actors (use culling distances where applicable) VFX Ect
We recommend targeting Sub 2000 draws, or as close to 1000 as possible. (Bear in mind the Editor itself adds a few hundred draws depending on how you have your widgets set up) as an estimate you can open an empty scene and look at the resting draws then subtract from the draws in your scene/view, typically between 300-600 Draws
FileSize too big?
The Unreal Size Map is a profiling tool used to analyze the memory and disk space usage of assets in a level or project, but unfortunately it’s not always 100% accurate. Our mods, like most packaged content in unreal engine, will compress to a certain extent meaning you're not shipping mods the size of your editor. However if you have made tons of content or brought in premade assets, it is easy to blow out your mod size. You can use unreal engines Size map feature to get a Rough estimate on how big your mod will be on build, It is not 100% accurate but will be a pretty good pointer for you to work with
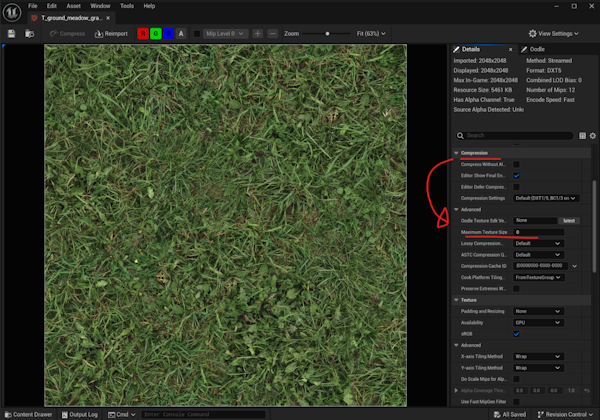
As example the RuralAUS Mod map Reduced their filesize just by dropping all their texture sizes to 1024 and then manually bringing up texture resolution as needed (using bulk editing

How to reduce Textures
Inside of your textures you can find the setting (Max size) if your textures are too big and are eating up your storage, consider dropping the resolution, that setting will allow you to non destructively change the build size, meaning you can fine tune what's high res and what's not to maximise your mods file size and still look great! (0 will default to normal size)
How to reduce meshes
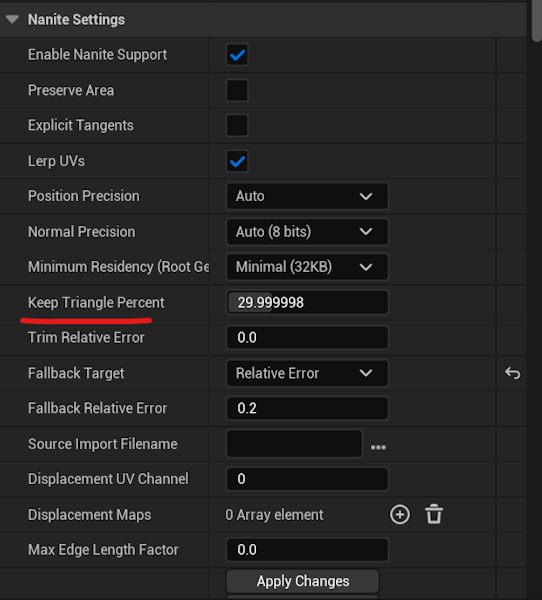
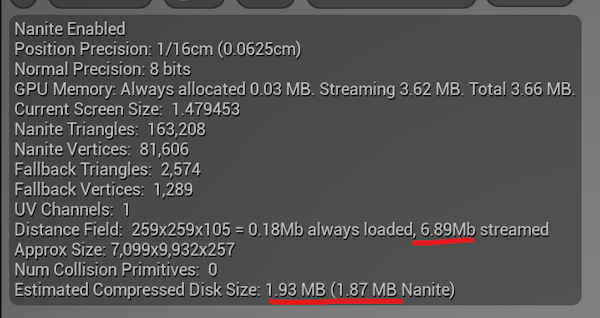
Within mesh editing you can reduce the build size using the mesh lodding and reduction settings, we have noticed that if a mesh imports Very big, it may not always compress down to what editor says, in that event Using unreal or your Modeling tool of choice permanently reduce the model size and reimport.
Remove unused assets (show reference viewer)
ADDITIONAL RESOURCES ON OPTIMISATION
Just to begin for a quick overview follow the summary below
If you have continued issues you can find more information in the following links
https://www.tomlooman.com/unrealengine-optimization-talk/
https://dev.epicgames.com/documentation/en-us/unreal-engine/guidelines-for-optimizing-rendering-for-real-time-in-unreal-engine#consolecommandsfordisplayingperformancestats
https://dev.epicgames.com/documentation/en-us/unreal-engine/unreal-insights-in-unreal-engine (unreal insights can be tricky to set up but will provide a very solid explanation of whats causing issues)
